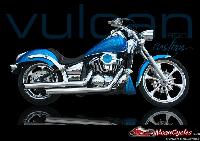
HEADLIGHTS & BUCKETS
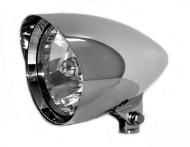
.COBRA II HEADLIGHT (CHROME OR BLACK)
$195.95
$149.95
Save:
$46.00
ACC UNLIMITED SOUTH
PART NO: ASL534HL


CUSTOMER REVIEWS (15)
On April 3, 2012 jert72 wrote:
Overall the look of the Headlight is Excellent, matching the wires up required me to use some crimp connectors with flat ends so I didn't have to remove the Stock harness. The stock headlight hides all the wiring for blinkers and gauges, so be prepared to have some extra wire to conceal. I lifted up the left side of the fuel tank on my 2005 Mean Streak and pulled back a considerable amount of wire which definitely helped clean up the cobbled mess of harnesses. Then used electrical tape to mask and seal up the wires, last I put a rubber/plastic heated shrink wrap around it for clean up the look of the wires. Overall I think the Headlight is great, but dealing with all the stock wires is a pain.
On August 15, 2011 BlackedOutVulcan wrote:
Had mine powder coated black and I customized my mounting bracket!!!!!!!!!
On March 17, 2010 bustcard wrote:

Mine is painted black. I had to drill out the hole for the cables to fit correctly.
On January 20, 2009 FL Vulcan Rider wrote:
This headlight looks so awesome. The installation was easy. On a 900 custom, the red wire on the headlight connects to the yellow wire on the bike. The yellow wire from the headlight connects to the red wire on the bike. The wiring is opposite. I drilled a center hole in the existing stock mounting bracket. The bike definitely looks a lot better.
On January 20, 2009 JC Meyer (FL Vulcan Rider) wrote:
I put this headlight on my Vulcan 900 Custom. It was very easy to install. The wires are backwards. The yellow wire goes to the red and the red wire goes to the yellow. I drilled a hole in the center front of the stock mounting plate. This mod took 1 hour to do. I drastically improves the look of the bike. My 900 custom looks a lot more stylish now. Definitely makes the bike look more aggressive and custom.
On October 27, 2008 mikester65 wrote:
Looks great, but I did replace the bulb with a higher-output version.
On August 14, 2008 Mike Meister wrote:
Good looking and good quality product. I drilled a new hole farther back on the stock bracket of my Vulcan 900 and it worked great. Ran the wiring back under the tank.
http://www.designsbymeister.com/photos/Vulcan_right.jpg
On July 10, 2008 Intruder Dude wrote:
This headlight is great for the price, well made and well chromed, certainly a fine lower price alternative to a Headwinds, etc. The light is bright and it gives the custom chopper look you're wanting :) Prepare for compliments.
Regarding changing the light. The advice to use something like grippy kitchen gloves or old rubber jar openers or a mouse pad is good I think, but it didn't work for me. But super clean hands and the gripping fingerprints God gave me did. The outer ring comes off, and you can use a small tap and hammer to tap the inner ring off.
There is plenty of room in the back of the inside of the headlight, I mention this because I know of others who drilled a hole in the back rear and used a rubber grommet to stuff headlight and signal etc, wiring inside.
On April 11, 2008 Fat Bob wrote:
Does anyone have photos of how this headlight looks apart?
On September 15, 2006 RacerX wrote:
Very nice headlight!
To answer the question, it's a pain, but can be done.
Here's what i did.
First, heat it up a bit with a hairdryer. this made all the difference, since i spent twice as long before this trying to break it loose.
Now get a good grip on it either mounted, or between your legs. use either a rubber grip like they use to open jars, or a plain, rubber mouse pad. start working it counter-clockwise. It won't move at first, and you'll keep slipping a bit. Keep trying and at some point it will break loose and spin off.
Now there is a second ring inside. I used a phillips screwdriver in one of the small holes.
Also go CC to unscrew. this is also a pain, and be careful not to slip and damage threads or the glass.
Once these are off, you're there.
I was told to apply some Loctite (I believe blue, or whatever the non-permanent one is.)
This will keep the trim ring from spinning off during normal use and vibration.
There you have it.